Stocktake for robotic stock
Stocktake - After Hours
1. CREATE JOURNAL
- Ensure the end of day process has been completed on all terminals that have processed transactions.
See Fred NXT Office > End of Day
- Commit or post any outstanding purchase orders and invoices.
- Print the Waiting Scripts report in Fred NXT POS and reconcile against items in the Waiting Scripts area.
Waiting script items are marked as sold and should not be included in the count.
See POS reports .
Items with no recorded barcode are not exported to the Export datasheet.
- From the FredNXT Head Office area page, navigate to Inventory and purchasing > Counting > New.
- From the Name dropdown, select CNT.
- From the Store inventory tab and select the required Site and Warehouse.

- In the same Counting journal, select Lines, then Add products.
- In the Hierarchy list, select the Robotic hierarchy.
- In Available products, select all the lines , then Add.
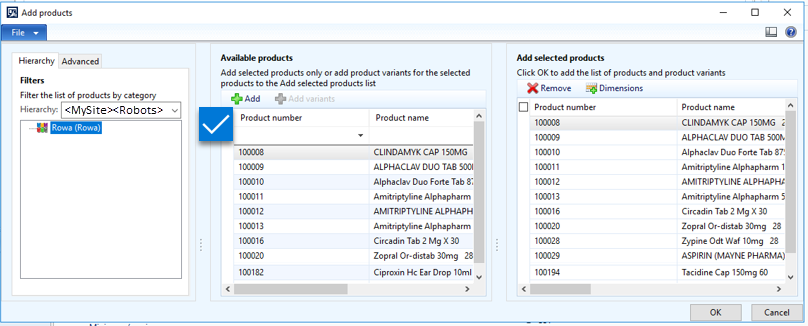
- Click OK to add all the Robotic products and the On-hand qty to the Counting journal.

- Once all the Robotic products have been added to the Counting journal, select Import/Export > Export stocktake and save the Counting journal to a local folder.
2. COUNT
- Generate the Robotic Stocktake report directly from the robotic dispenser.
-
Combine the data in the Counting journal with the data extracted from the robotic dispenser.
Update the Counted column (Column L) in the counting journal with the extracted Stock On Hand information from the Robotic Stocktake report.

In the counting journal, products with multiple barcodes display on multiple lines (one line per barcode).
- Depending on your preferred method of counting, do one of the following:
- Enter a cumulative count for all barcodes of the same product on the first line, and ensure all the other lines display 0 in Counted.
— OR —
- Leave each line as it is if you are counting each barcode separately.
- Enter a cumulative count for all barcodes of the same product on the first line, and ensure all the other lines display 0 in Counted.
- For each product listed in the Counting journal, use the Robotic Stocktake report to ensure the All Robots Supplemental Hierarchy is up to date.
- If a product is present in the Counting journal, but missing from the Robotic Stocktake report, it must be removed from the Robotic hierarchy in Fred NXT Head Office. The line must also be deleted from the Counting journal prior to re-import into Fred NXT Head Office.
- If a product is present in the Robotic Stocktake report, but missing from the Counting journal, it must be added to the Robotic hierarchy in Fred NXT Head Office. It must also be manually added to the Counting journal prior to re-import into Fred NXT Head Office.
The Stock on hand values provided in the Robotic Stocktake report are used to update and correct the Counted values in the Counting journal.
For details about creating and maintaining the Robotic hierarchy, refer to Fred NXT Head Office > Robotic stock.
3. IMPORT JOURNAL
Once counting is completed, the counting sheet can be imported directly into Fred NXT Office to updated the counted values.
The Import Stocktake function is available from the main Stocktake grid or from each individual stocktake.

The import function only accepts .csv files. If the counting sheet has been converted to another file format, it must be saved again as .csv prior to import. You stocktake provider will take care to re-format the barcode column in the file to ensure it displays as required.
- From Stocktake, click Import Stocktake:
- If accessing Import Stocktake from the Stocktake grid, you can select from all the existing open stocktakes.
- If accessing Import Stocktake from an existing stocktake, it is already selected in the wizard.
- Click Browse to select the completed .csv counting sheet.
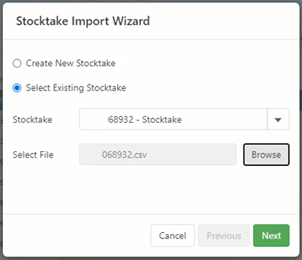
- Click Next to move to the column mapping screen.
- Use the Select drop down to map each header in the .csv counting sheet to a header in the stocktake grid.
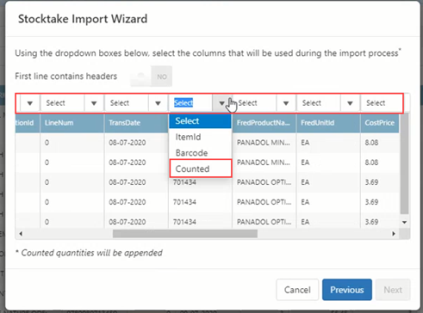
- (Required) Ensure that at least once header is mapped to Counted.
- (Optional) Map other columns to ItemId and/or Barcode.
If either or both these columns are mapped, they are used by the Import wizard as additional matching criteria.
If a match cannot be found, this row will be imported.
- If the first line of the .csv counting sheet contains header, switch the toggle to Yes to exclude this row from the import process, as it will cause the import to fail.

- Click Next to start the import process and review the import results.
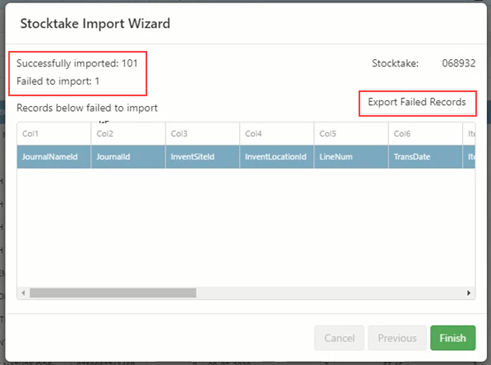
- If the import contains failed rows, click Export Failed Record.
Failed records are saved to a .csv file. An Error Log header is added to provide details about the failure to import each row.
Once corrected, this same file can be used for re-import. In this case, the counted quantities would be appended to the stocktake.
Alternatively, you may chose to ignore the failed rows and complete the process.
- Click Finish to complete the import and return to the open stocktake grid.
- Review the values in the Counted column, then click Commit to finalise the stocktake and update the SOH (at the store and at Head Office).
- Once the file has been imported, open the Counting journal and personalise the screen by adding the fields FredIsCounted and Cost price
For details about using the personalisation tool, refer to Fred NXT Head Office Tips + Tricks > Personalising your view
- Review all the lines where FredIsCounted is not selected and check for any error.
This is usually caused by the absence of barcode and indicates that this particular line could not be exported in the counted journal.
These lines should either be updated or transferred to an error journal (at the time of posting) for subsequent review by the store.
- Review any lines where the Cost Price is 0 and update, if applicable, before posting the journal.
If the Cost Price is 0, the adjustments will be posted as $0.00 which will affect the inventory cost for the item at this store.
Update the Cost price from 0 to 0.01 to allow the adjustments to continue.
- Check the file for counting variations:
Check Issue Update Check for large changes between On-Hand and Counted. Stock may be located in more than one area in the store. - Ask the stores to re-check items in the machine and on the shelf.
- Remove or manually check the SOH at the second location to ensure the figures are correct.
Check items that have a decimal On-Hand value. For example, 7.75. There may be broken packs that are not stored in the robot. - Ask the stores to re-check items in the machine and on the shelf.
Check for items with negative values in the On-Hand column. Stock may already be on order or special orders - awaiting on stock. - Do not count these products as 0, otherwise the SOH will be incorrect when they are received into the store.
- Select Validate in order to check the lines are ready for import.
- When done, click Post to post the adjustments.
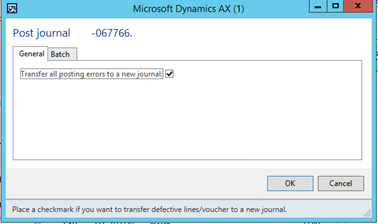
If lines have not been marked as counted (in the previous step) and could not be manually updated, it is recommended to select the option to Transfer all posting errors to a new journal. This journal can then be updated after review with the store.
- Review the batch posting to ensure the batch has been posted.
4. REPORT
During a stocktake you will find products that cannot be counted. For example, products with an invalid barcode in Fred NXT Head Office or products that do not exist in Fred NXT Office.
All these products should be set aside and handled after the stocktake.
- In Fred NXT Office, search for the product in Search Products ...

You can search by barcode or description.
- Click Quick Update.

- In Quick Update, enter the correct available total SOH value for this product and adjustment reason
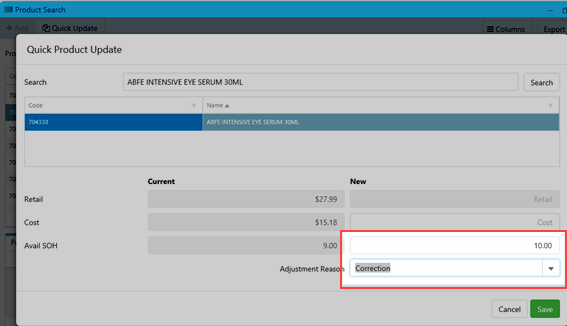
- Save your changes.
- For any product that can be found in Fred NXT Office with a missing barcode, add the barcode yourself or contact you Head Office.
- For any product that cannot be found at all, inform your Head Office to create the product.
This process helps you check for products that may have been missed in a prior batch count.
- In Fred NXT Office > Stocktake, click Add Product.
- Filter Products Counted prior <Date>.
- Enter the date you began counting the items in your stocktake to find any items that were either never counted, or had been counted prior to this date (for example, in previous stocktake).
All items have a default Counted date. This ensure that items that were never counted are captured by the filter.

 Fred Learning Pathways