Perform an invoice pricing review
This topic includes an example of performing an invoice pricing review.
Items with a Pricing Plan are first set to obey this pricing structure. Price Guides are then used to set the Retail price for a number of items. Selected items will then have their Retail price set based on a 60% mark up. Then an item will have their Retail Price Level A manually updated with Price Levels. Finally, the Pricing Review will be committed (so that Prices take effect immediately) and Labels printed.
Below is a general outline of this procedure:
- Open the Invoice Pricing Review.
- Review and update prices
- Apply Pricing Plan prices (relevant items only)
- Apply a Price Guide to a selected item
- Apply a 60% mark up to selected items
- Manually update Retail price for an item
- Manually update Price Level A for an item
- Commit the Pricing Review
- Print Label Queue
Step 1: Open the Invoice Pricing Review
- Click Pricing.
- Click Pricing Review.
-
Double-click to open the Invoice Pricing Review.
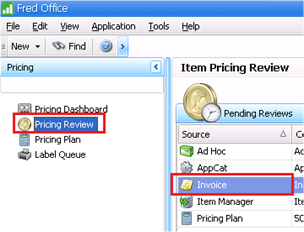
Multiple invoices can be priced together. To do this, select the Invoice Pricing Reviews using the <CTRL> key and clicking with the mouse. Then right-click and select Open Pricing Review.
Step 2: Review and Update Prices
-
Click the Pricing Plan column heading.
This will sort items by the Pricing Plan column. Items that have a pricing plan will appear on top making them easier to find. Items will also have a suggested New retail price relevant to the preset rules associated with the Pricing Plan.
-
Hold down the <CTRL> or <SHIFT> keys then click to select multiple items.
- Click Set to Accepted.
- Right-click the item.
- Select Pricing Options.
-
Click Use Price Guide.
See Price Guide for more details.
- Hold down the <CTRL> key then click to select items.
- Select Tools > Selected Pricing Options.
- Select Set Markup %.
-
Enter 60 click the tick to apply the mark up.
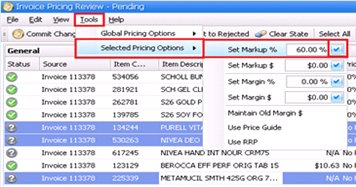
To apply changes to all items instead of only selected items, select Tools > Global Pricing Options. This will update all items listed on the Pricing Review.
- Click into the New Retail price field.
- Type the new price and press <ENTER>.
The retail Movement column helps to track whether the items price increased (a green arrow pointing up) or decreased in price (a green arrow pointing down).
- Click to select the item.
- Click into the New columns to adjust the Price Level.
- Type the new price or percentage and press <ENTER>.
Price Level B and C can also be updated the same way using the Summary Pane.
Status Column
The item Status tracks changes made and indicates what will happen once the Pricing Review is committed.

The icons in the Status column indicate the following:
- Green tick: The price has been reviewed and will be applied once the Pricing Review is committed.
- Red cross: The item has been rejected from being reviewed at this time (by clicking Set to Rejected from the toolbar). When the Pricing Review is committed, these items will be removed from the Pricing Review without applying any price updates.
- Question mark: The item is still to be reviewed and will remain in the Pricing Review if it is Committed.
Step 3: Commit the Pricing Review
-
Click Commit Changes.
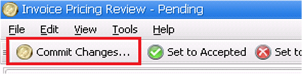
- Type a description for the pricing review.
- Click Immediate.
- (Optional) Click Show me the Label Queue after committing for immediate label printing.
- Click Commit to apply the price changes.
Immediate applies the price changes straight away. Alternatively, select Choose Date to set the effective date for when the new prices will apply.
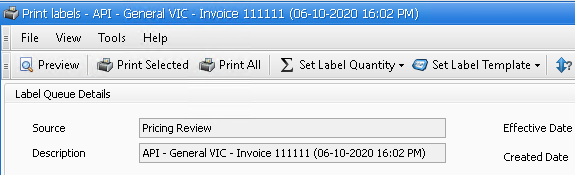
Step 4: Print Label Queue
The Label Queue displays the details a description of the pricing review.
- Click Set Label Quantity and set the quantity.
- Click Set Label Template and select a template.
-
Click Print All.
The quantity can also be manually adjusted by clicking directly into the Label Qty field.