Configure and print statements (bulk)
Once statements are generated, they can be printed for individual accounts or printed in bulk. Before statements are generated however, it is important to ensure the correct options are configured. These can be adjusted at any time, however statements will need to be regenerated to take into account new settings.
-
From Contacts, select Accounts.
-
Search for and open the account.
-
Go to the Account Address tab and do one of the following:
Issue Resolution If Let me specify a specific address to use is selected: Ensure details are entered in the below fields, and the click Save. If Use the customer address that this account belongs to is selected: Go the General tab.
Click Browse [...] next to the Customers.
In the General tab enter the details, and then select Save and Close.
The Customer card closes and Fred Office Plus returns to the Account card.
If Let me choose a Nursing Home and use that as the Billing Address is selected: Ensure a Nursing Home is selected.
If there is no Nursing Home selected, click Find and select one.
In Fred Dispense Plus, enter the Nursing Home address information.
If Let me choose another customer and use that as the Billing Address is selected: Ensure a customer is selected.
Go to the General tab.
Click the ellipsis... next to the Customer to browse.
Enter details in the General tab.
Click Save and Close.
You must first delete, then re-generate the statement for the change to take effect.
- From Contacts, select Statements.
- Under the Statement Schedules section, do one of the following:
- Select Add... to create a new scheduled run.
— or —
- Select Edit ... to modify an existing scheduled run.
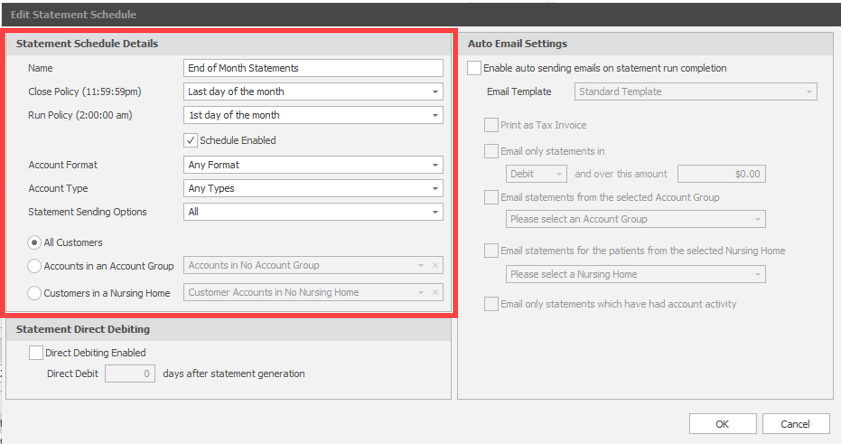
- Enter a name for the run. For example, End of Month Statements.
- Set the Close Policy to Last Day of the Monthand select a Run Policy day.
- Tick Scheduled Enabled.
- Configure Statement options such as specifying the account format, account type and sending options. (If required) set the filters to limit the Statement to specific Account Groups and/or Nursing Homes.

- Click OK and Save.
You can use the monthly run to generate statements for specific account groups. Refer to Set up and manage account groups
- From Contacts, select Statements.
- Click Print.

- In the Print Statement screen, set the Statement Print Options as required:
-
Item Description Statement Restriction Restrict which accounts should be included for printing.
Focus on a specific account group such as accounts in a Nursing Home or a user-defined account group.
Print settings Set your Group By and Order by preferences. - Click OK to save your settings.
Before you Print your scheduled statements, you must Resolve any issue.
- From Contacts, select Statements.
-
Ensure the number in the Accounts column is the same as the Generated column.
- To resolve any issues, select the last Statement batch, and then click Resolve.
-
This option is only active for the last scheduled statement run (if statement generation issues are found).
- Select the account and do one of the following:
- To view the account card, click Open ...
To remove and regenerate the statement for this account based on the current statement schedule, select Regenerate.
Issue Description Resolution Forward An existing statement exists with an end date greater than that of the statement schedule. Click Open….
View Statements and/ or Activity tabs.
Close the account card.
Closed Accounts closed during this statement period. ClickOpen….
View Statements and/ or Activity tabs.
Close the account card.
Short Accounts with a short period (usually due to a mid period statement generation). Click Open….
View Statements and/ or Activity tabs.
Close the account card.
(Optional) Click Regenerate.
- Repeat above for all accounts as required.
- Once complete click Close.
- Click Print.
- In the Print Statement screen, set the print options, and then click OK.
-
Fred Office Plus generates the report as PDF.
-
Select File, then Print.
Remember to check and set the Page Scaling or Page Arrange options to None or Actual Size to prevent page misalignment. Make sure your statement (or A4) paper is loaded in the printer.
- Click OK .