Individual account statements
Statements can be created, printed and emailed individually to customers or sent in bulk. Before statements are generated however, it is important to ensure the correct options are configured. These can be adjusted at any time, however statements will need to be regenerated to take into account new settings. Similarly, email options need to be configured before statements can be emailed to customers.
- From Contacts, select Accounts, and then select Statements in the toolbar.
- Tap Print Statement.
- In the Print Statement screen, set the Statement Print Options as required:
- Tap OK to save your settings.
The Statements screen is displayed.
| Item | Description |
|---|---|
| Statement Restriction | Restrict which accounts should be included for printing. Focus on a specific account group such as accounts in a Nursing Home or a user-defined account group. |
| Print settings | Set you Group By and Order By preferences. |
- From Contacts, select Accounts.
- Search for and open the account.
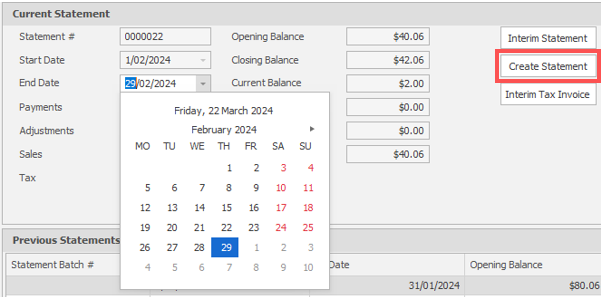
- In the Statements tab, select the End Date.
- Click Interim Statement.
The Interim Statement automatically opens as a PDF , ready for printing.
This is the recommended option. No record of the Interim Statement is maintained on the account. It is not displayed in Previous Statement or Statement History.
For a permanent statement record, click Create Statement.
- From Contacts, select Statements.
- Highlight the current schedule (bottom of page) and click Print.
- Select Print Statement options and OK.
The settings selected in Print Statements are retained until the next time you print statements.
- Click the printer icon and OK.
You must first configure Fred Office Plus to send emails. Refer to Configure and email statements (bulk).
You can send statements to a single account card.
- From Contacts , select Accounts.
- Search for the account.
- Right-click the appropriate account card and select Open Account.
- Select the Statements tab.
- Under Send Statement Option, select Email Statements to and enter the new email address.
- To email the statement, tap the Email button.
- Choose the template you wish to use for this account customer.
- To send the email, tap OK.
- To finish, tap OK.
The account card is displayed.
A confirmation message is displayed.
- In the open account window, click on the Statements tab.
- Select Delete, then Save. This will delete the most recent statement batch.
Use the drop-down and select the End Date.

- Select Create Statement, then select Save and Close.
To hide a transaction or an adjustment from printing on a statement, there must be an overall effect on the account statement period of zero dollars ($0.00). You need to match a credit dollar value to the same debit dollar value to hide both from printing. This also means the transactions to be hidden must occur in the same statement period.
(Optional) Remove (unroll) the previous statement(s)
- From Contacts, select Accounts.
- Search for and open the account.
- In the Statements tab, tap Delete at the bottom of screen to delete the previous statement(s).
- Tap Save.
Hide the credit/debit
- From Contacts, select Accounts and search for and open the relevant account.
- Select Activity and then select Hide Acclivity from the context menu.
- Select the relevant transaction from the list of available reverse activities.
- Click OK.
- Click Save and Close.
The hidden activities are now selected in the Hiddencolumn.
Hidden activities do not print, but are visible in Fred Office Plus.
Regenerate and print the updated statement
- In the Statements tab, select the End date for the previous statement.
- Select Create Statement.
- Close the PDF statement.
- Select the End date for the current statement.
- Select
 , then OK to print.
 - Close the PDF statement.
- Click Save and Close.
The updated statement appears.
The updated statement appears.