Import a promotion file
Step 1: Obtain the promotion file
The promotional file for your Pharmacy Brand can be imported into Fred Office Plus. You willobtain the promotion files from your Brand Support Office.. If you are unsure, contact your Group Support Office.
Once you have downloaded your promotional file it is recommended that you do not open the file prior to importing into Fred Office. Opening the file can cause it to lose importing formating which prevents it from importing correctly into Fred Office.
Step 2: Import the promotion file
The procedure outlined below presumes you are importing a file where all items are part of the same date range promotion (for example a catalogue)...
- Click Pricing, then Promotion.
- Click New.
-
Enter a Promotion Name and Description for your promotion.
-
(Optional) Select an existing Campaign to add it to, or select New Campaign and enter a Campaign name.
- Ensure the Promotion Type is set to Date Range Promotion (set by default).
-
Enter the Promotion Start and End date.
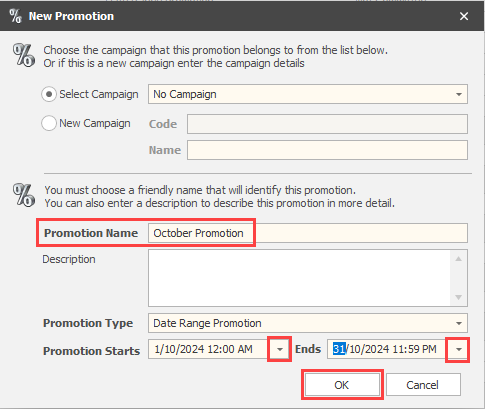
- Click OK.
-
Click Import items, then click browse.

-
Navigate to where the promotion file is located on your computer, select the file then Click Next.
A pop up window will appear confirming whether to fast load.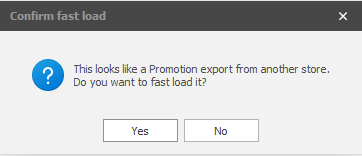
-
Click Yes.
-
Click Next. If there were any unmatched items then the AppCAT Matching step will appear. This allows you to attempt to find unmatched items using AppCAT.
-
Select the suppliers you wish to use for AppCT matches. If no suppliers are selected it will search against all of them.
Click Next. -
Click Next to review the matches.
-
Click Import Items, then click Browse.

-
Select Comma Separate Values (.csv) from the file type drop down list.

-
Navigate to where the promotion file is located on your computer, select the file then click Open.
-
Select the worksheet (if required), then click Next.
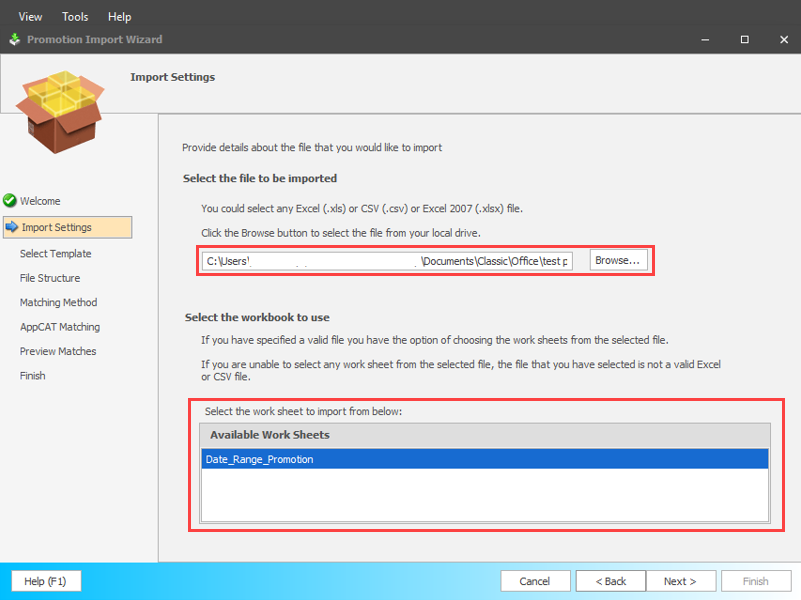
-
Select Let me map columns manually, then click Next.
-
Click and hold your mouse on a field from the Column section at the top of the screen. While still holding, move your mouse onto the header line of the column with the relative information in your data preview displayed below. When your mouse is over the correct column heading, release the mouse button. This will slot the column heading into the correct position. Any columns that are left as "skip" in the lower grid will not be imported. If the imported promotion file has column headings tick First row in the file is the column header.
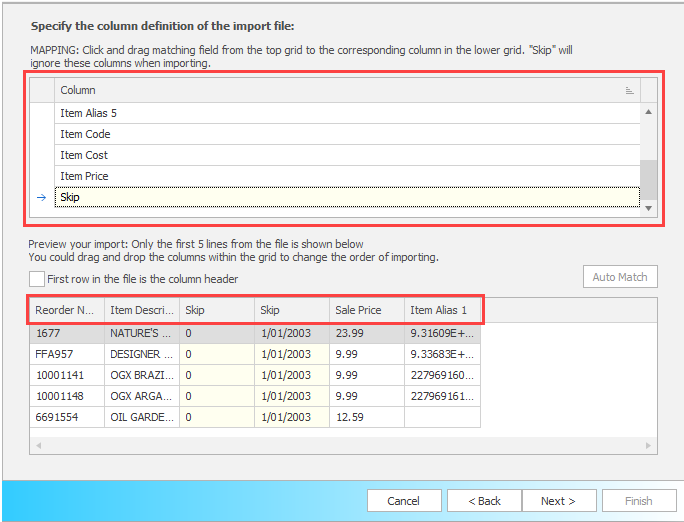
-
Choose the fields in the file (Worksheet Field) to use to match to fields in your own database (Item Card Field). Then click Match. The number of items able to be matched will display.
Matching can be reattempted by adjusting the fields above and clicking Match once more (if required).
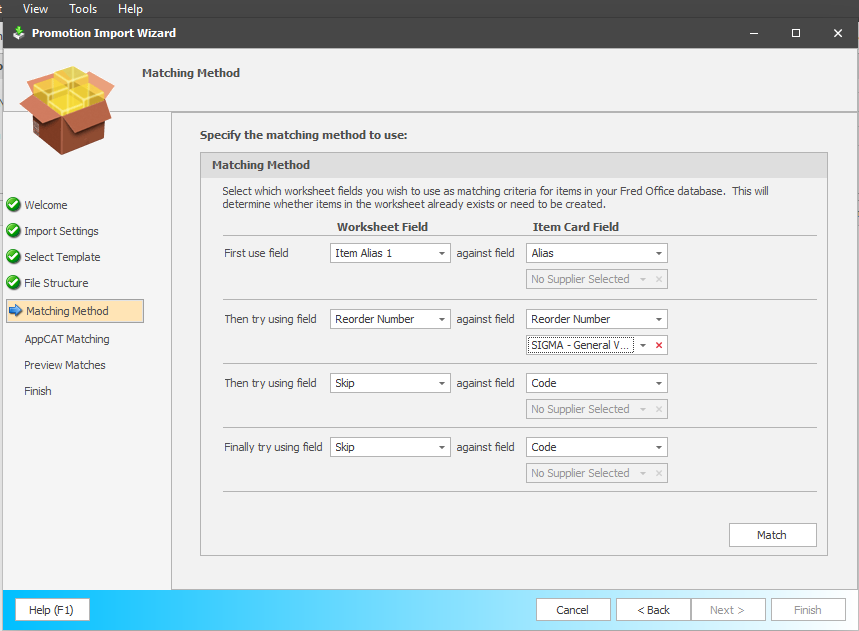
- Click Next.
If there were any unmatched items then the AppCAT Matching step will appear. This allows you to attempt to find unmatched items using AppCAT.
-
Select the suppliers you wish to use for AppCT matches. If no suppliers are selected it will search against all of them.
Click Next. -
Click Next to review the matches.
-
Click Import Items, then click Browse.
- Select Comma Separate Values (.csv) from the file type drop down list.
- Navigate to where the promotion file is located, select the file then click Open.
- Click the file, then Open.
- Select the worksheet (if required), then click Next.
- Select the template, then click Next.
If you need to change the column matching, click and hold your mouse on a field from the Column section at the top of the screen. While still holding, move your mouse onto the header line of the column with the relative information in your data preview displayed below. When your mouse is over the correct column heading, release the mouse button. This will slot the column heading into the correct position.
-
Click Next, then select the fields in the file (Worksheet field) to use to match to fields in your own database (Item Card Field).

- Click Match.
The number of items able to be matched will display.
Matching can be reattempted by adjusting the fields above and clicking Match once more (if required).
- Click Next.
If there were any unmatched items the AppCAT Matching step will appear. This allows you to attempt to find unmatched items using AppCAT.
- Click the supplier(s), then click Match.
- Click Next to review the matches.
-
Review the matches found in Preview Matches.
- Use filtering to restrict the view to show only relevant items to be reviewed.
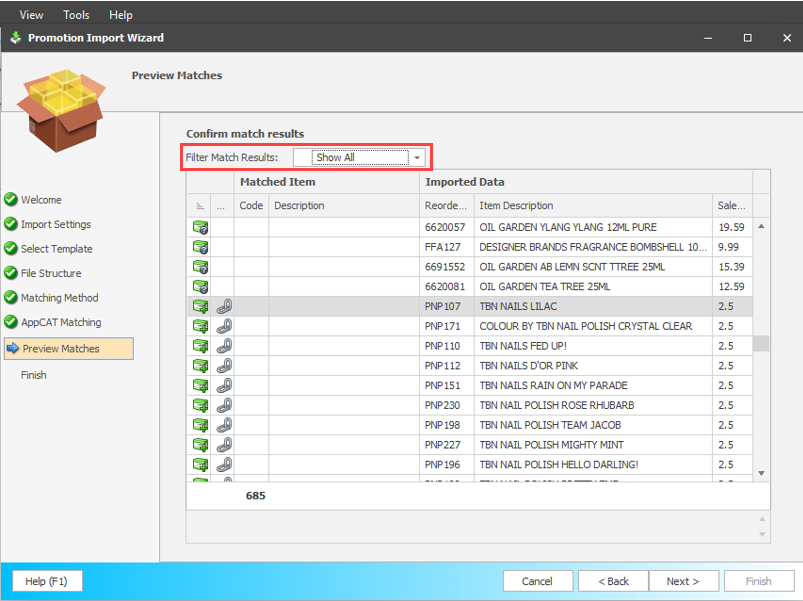
Filter Description Show Matched Item Exists in Fred Office Plus already. Show Found in AppCAT Item is found in AppCAT but does not exist in Fred Office Plus. Show Unmatched Item is unrecognised in AppCAT and does not exist in Fred Office Plus. Show Errored Data type is not recognised and no matching can be checked. -
Click the filter and select Show unmatched.
If any items display, right-click and select Match Item.
- Enter a search term and click Search.
-
Select the item from the Search Results then the forward arrow to move it to Selected.
-
Click OK. Follow these steps to continue matching any unmatched.
Any items which are Found in Appcat or are left Unmatched will automatically load within the Create Item Wizard after the Promotion Import Wizard is completed. If you do not wish to create these items in your Fred Office database, highlight them then right click and select Delete.
- Then click Next.
If new items were found, you will be prompted to create these items with the Create Item Wizard once the current Promotion Import Wizard is finished.
-
To save the promotion import template select Check this box to allow saving of this template and enter a template name.
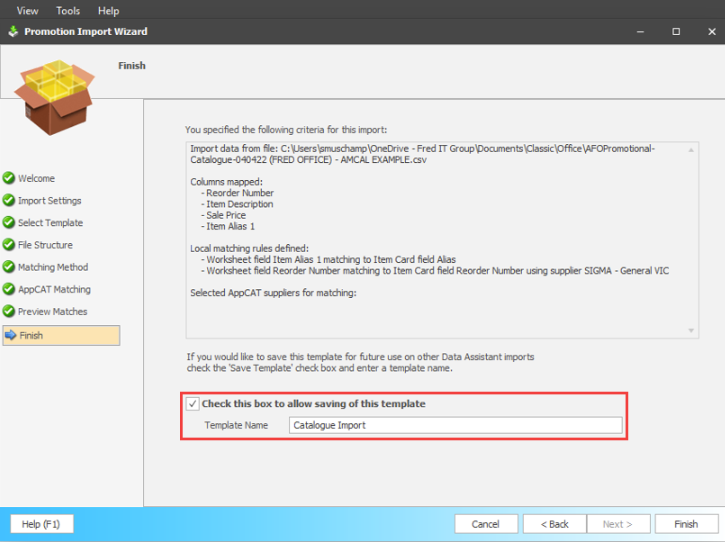
- Click Yes to launch the Create Item Wizard after the Promotion Import Wizard is finished.
- Click Finish.
If a new(s) item existed and Yes was selected earlier, the Create Item Wizard will now launch.
Once the new items have been created in the Create Item Wizard in this way, they will automatically be added to the worksheet and you will be brought back to the worksheet.
Step 3: Add items to promotion manually (if required)
If you need to, you can add extra items to the promotion by Group, Supplier, Department, or individual items.
- Click Add Items.
- Click the drop down next to Search and click Search by Group.
- Click the drop down and select the item group and click Search.
- Click the double forward arrows to add all items to Selected.
The <CTRL> and <SHIFT> keys can be used to select only some of the items from the group. The single forward arrow can then be used to add only the selected/ highlighted items to Selected.
- Click the drop down next to Search.
- Click Search by Supplier.
- Click the drop down and select the department (and/or category).
- Click Search.
-
Click the double forward arrows to add all items to Selected.
The <CTRL> and <SHIFT> keys can be used to select only some of the items from the group. The single forward arrow can then be used to add only the selected/ highlighted items to Selected.
- Click the drop down next to Search.
- Click Search by Department.
- Click the drop down and select the department (and/or category).
- Click Search.
-
Click the double forward arrows to add all items to Selected.
The <CTRL> and <SHIFT> keys can be used to select only some of the items from the group. The single forward arrow can then be used to add only the selected/ highlighted items to Selected.
- Enter an Alias, Code or Description and click Search.
- Highlight the item(s) you want to add and click the single arrow to move the item(s) to Selected.
Alternatively all items returned in the search can be moved to Selected, via the double forward arrow. The single back arrow and double back arrow can be used to remove items from Selected.
- Repeat the search and selections until all items required have been moved to Selected.
- Once complete, click OK.
- Click Sale Price and enter the price.
-
— OR —
- Right-click the item and select Set Sale Price by then use the option required and add a tick to apply.
If you only want to apply options to selected items instead of all items, you can use the <CTRL> and <SHIFT> items to select the items and select Selected Promotion Options instead of Global Promotion Options below.
- Click Tools menu, Global Promotion Options.
- Click Set Sale Price by.
- Enter the dollar value or percent to discount.
- Click the corresponding tick to apply.
Step 4: Review items set to ‘not discountable’
Items added to a promotion are automatically set to Not Discountable which prevents further discounts being applied at the POS.
To allow further discounts on top of the promotional price, uncheck the Not Discountable checkbox.

Alternatively, this can be done in bulk by:
- Click Tools menu, Global Promotion Options, Set item not discountable.
At the end of the promotion period, this flag will automatically be reversed back to the setting of each item prior to the promotion.
Step 5: Queue labels manually (optional)
- Click Queue Labels.
- Select All Items or Selected Items.
Step 6: Commit the promotion and Queue Labels
-
Click Commit.
Labels can be sent to a Queue at this stage.
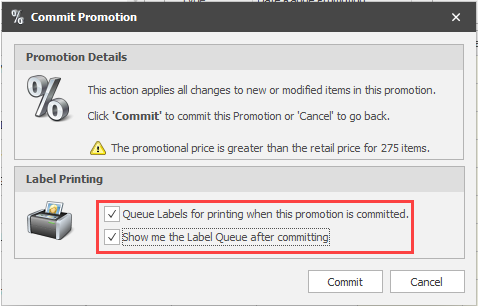
- Click Commit to confirm.
- Close the Promotion.