Create a new dispense item
Use this process to create Dispense items if you adding dispensary items listed in AppCAT using the Create Item Wizard. You will select the following options to ensure that dispensary items are processed correctly at the POS till:
- Set items as Not Discountable and leave retail price as zero. This allows items to be sold at the till at the dispensed price and prevents further discounts.
- Set items as Hide on Net Display for privacy so that item names don't display on customer facing screens.
- Use supplier code as the item code (typical setting)
- Do not print item labels
You will also need to make sure the item is matched to a drug so item card is correctly updated when a drug is dispensed and sold.
- Select Inventory > Items.
- Click Create Item Wizard.
- Click Next to move past the welcome screen if it displays.
-
Type the name of the item you want to add and click Search.
The drop down can be used to search by alias (barcode) or reorder number instead. While the tick box allows you to perform a loose search (that is searching anywhere in the AppCAT item description for the term you have entered rather than from the start only). For assistance with search terms refer to the AppCAT supplier prefix list.
- Select the items in AppCAT Search Results you want to add.
-
Click Add.
The selected items will display in AppCAT Selected Items.
You can select multiple items by holding down the <CTRL> (control) key on the keyboard and clicking on each item. Alternatively you can select a consecutive number of items by holding down the <SHIFT> key and clicking on the first and last rows of the items to be included.
Items with a link icon
 displayed are
already matched to items in your database and cannot be added
again.
 - Leave Use supplier code as Item Code ticked (by default) and click Next.
- Ensure a supplier is displayed for all items.
-
Add, edit or remove suppliers as required—click the drop down and select Add, Edit or Remove.

Suppliers can be added in bulk. Once a supplier exists for one item, right-click that item and select Create Supplier For All Items to quickly add it to all items. Right-click again and select Generate Random Missing Codes to speed up the process of adding reorder codes for these suppliers (which is mandatory).
-
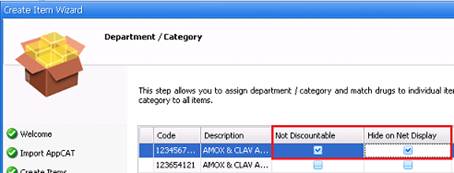
Ensure a Department, Category and Drug (where appropriate) is displayed for all items. Select as needed using the drop down arrows.
Department and Categories can be set in bulk. Once an item has the correct department/ category selected, right-click and select Set As Global Department or Set As Global Category to quickly set for all items. If an item is in a different department, you need to change the department first before changing the category.
- Right-click on the column heading and select Column Chooser.
-
Drag and drop in Not Discountable at Register and Hide on Net Display.

- Tick both these options for the first item.
- Right-click and select Set As Global Non-Discountable and click OK.
- Right-click and select Set As Global Hide on Net Display and click OK to confirm.
- Click Next.
-
Enter the Reorder Point, Restock Level and select ROU Scheme using the drop down.
It is not recommended to enter the Stock Quantity for items here. It is recommended to receive stock in via regular procedure.
- Click Next.
-
On the Item Aliases step, click the pull down to add or remove an alias.

-
Click Next.
Do not to adjust pricing (such as Price, Margin or Markup) as this will affect dispensary pricing.
- Adjust the Cost Price and Item Tax as appropriate and click Next.
- Remove the tick from I wish to print labels for these new items.
- Click Finish.