Products
Assortments are used to group products in a hierarchy (primary or supplementary), so they can then be released to a particular store. The number of assortments required depend on which store the products are relevant to. Managed Assortment holds all the products managed by Head office. Any product included in the Managed assortment is available to all stores assigned to that Managed assortment. The Managed assortment links directly to the Managed Supplemental hierarchy. Local store assortments can be used for managing products specific to a particular store.
Assortments are very versatile and can be set for a single store, a specific purpose (for example, a Christmas catalogue). Multiple hierarchies can be grouped together into an assortment for monthly promotional catalogue available at all stores.
- Navigate to FredNXT Head Office area page > Merchanding and click Assortments.
- In Assortments, click Assortments - New.
-
Complete the following fields:
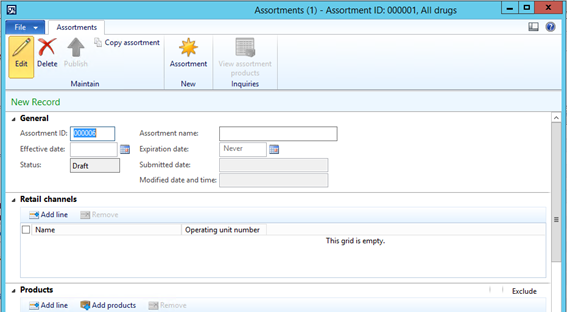
Field Description Assortment ID Defaults to a system-generated number, but can be overwritten. Effective date Select the date the Assortment is effective from.
Can be back-dated, if necessary.
Status Set to Draft by default. Assortment name Enter the name of the Assortment. Expiration date Select the date the Assortment expires, if required.
Otherwise leave it blank.
Submitted date Submitted date is the date the assortment was published. Modified date Modified date will default to the last time changes were made to the Assortment.
Assortments are groups of products assigned to a particular store. At least one Retail channel (Retail store) must be assigned to the assortment.
- Navigate to FredNXT Head Office area page > Merchanding and click Assortments.
- In Assortments, click the Retail channels fast tab.
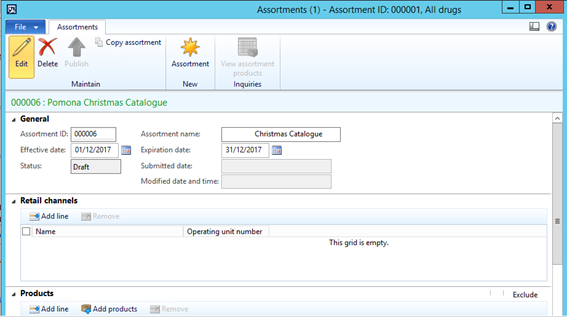
- Click Add line to open the Choose organisation nodes window.
- Do one of the following:
- Search for and select the Retail stores or Retail groups to be assigned to this assortment,
— or —
- To assign the assortment to all stores, select the highest node in the hierarchy.
- Search for and select the Retail stores or Retail groups to be assigned to this assortment,
- Click Add to add your selection.
- When all required stores have been added, Close the window.
The selected Retail stores are now displayed on the Retail channels fast tab.
If an incorrect Retail store was added, select the record to be removed, then click Remove.
- Close the window to save your changes.
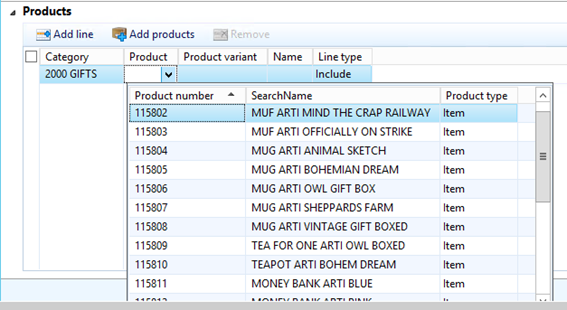
- On the Products fast tab, click Add line to add a single product.

- To filter the list of products for selection, select the required Category node from the Retail hierarchy dropdown list.

By default, the Retail hierarchy is displayed. You can switch to a Supplemental hierarchy (if required) from the Hierarchy dropdown list.
- Select the required Product.
By default, this list displays only products assigned to the selected category node.
All relevant information will default for the selected product.
- To add multiple products, click Add products to open the Add products window.

- Search for the required product(s) by category node.
By default, the Retail hierarchy is displayed. You can switch to a Supplemental hierarchy (if required) from the Hierarchy dropdown list.
- Select the required product(s) from the Product drop-down list.
By default, this list displays only products assigned to the selected category node.
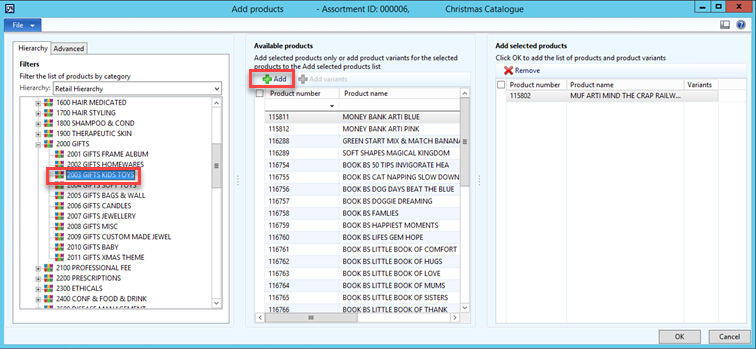
- Select the required products and click Add.
- If there are more products to be included in this Assortment, navigate to the next required category node and add products.
- Once all required products have been added, click OK.
The products just added are now displayed on the Products fast tab.

- Complete the following fields:
Field Description Category - If the product was added to the Assortment using Add line, the selected category node displays in this column.
- If the product was added using Add products, this Category column is left blank.
Product Product Number Name Product Name Line type By default, all products added to an Assortment will default to Include.
Line type is a quick way of excluding a minimal number of products from a category, when the entire category has been added to an Assortment.
You can add an entire category of products as a line, and then set specific products in this Category to Exclude.
Once the Assortment has been created, all Retail channels assigned and all products added, it can be Published.
- Click Publish.
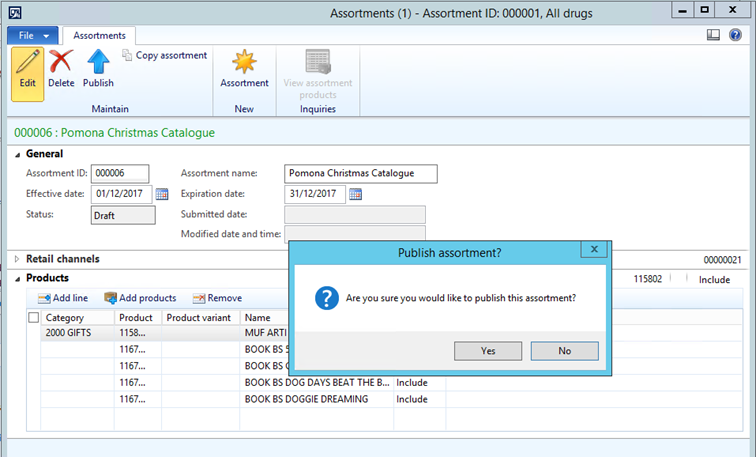
- At the confirmation prompt, click Yes to publish the Assortment.
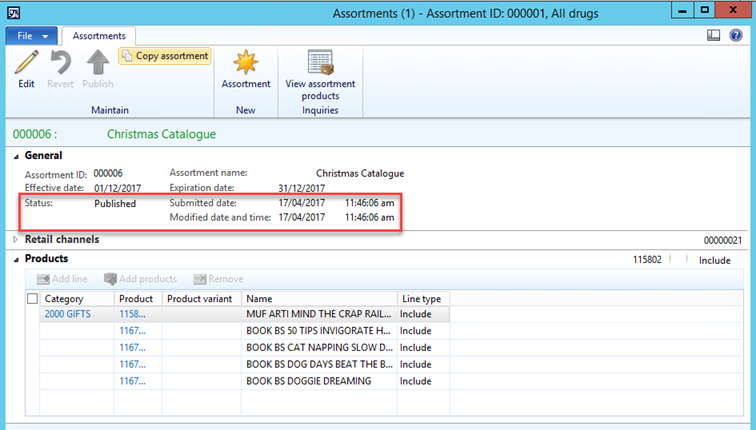
The Assortment is now Published and no further editing is allowed.
- The Status is now set Published.
- The Submitted date is now set to the Published date and time.
- The Modified date and time is now set to the Published date and time.
- Close the Assortments form.
Any assortments with a Status of Draft can be edited.
If an Assortment has been Published and requires further editing, this is allowed, but the Status of the assortment reverts back to Draft.
- Navigate to the Merchandising section, then click Assortments.
The list of available assortments is displayed,
The Status column indicates if the assortment is still a draft or has been published. Published assortments indicate that these products have been released to a store.
- Double-click the assortment to view further details.
- The Retail Channels section displays which store the assortment is associated to.
- The Products section displays the categories that are linked to this assortment.
- Click Edit to enable the options to modify retail stores or categories for the selected assortment.
Under Products, click Add line if you want to add another Category or another Product, then select from the relevant drop-down list.
- Click Close to save your changes
The updated assortment must be published again to push the changes out to stores.
An Assortment can be copied to save time.
- Select the Assortment to be copied and click Copy assortment.

- At the confirmation prompt, click Yes to continue copying the Assortment.
A new assortment is created.
All details will be copied from the original Assortment, including:
- Effective date
- Expiration date
- Retail channels
- Products
- Click Edit
- Continue to edit the Assortment as required.
An assortment can be deleted if it has not been published.
The Delete button is only available for assortments with a Status of Draft.
- Select the Assortment to be deleted.
- Click Delete .
- At the confirmation prompt, click Yes to confirm deletion of the assortment.
- On the Retail store form, select the required Store and click View assortments.

- A list of Assortments where the selected Store has been assigned as a retail channel is displayed.

If you need to create a supplemental retail hierarchy, refer to Supplemental hierarchies.
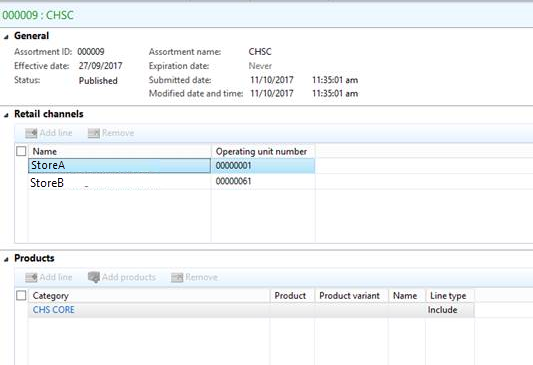
In this example, a supplemental hierarchy and assortment are required to group items together at the store for the purpose of ordering a selected range of core products from a supplier called CHS.
- Navigate to FredNXT Head Office > Merchandising > Assortments and create an Assortment as follows:
- CHSC = Level 0 Node
- CHS Core (or what is seen at the store) = L1 Node
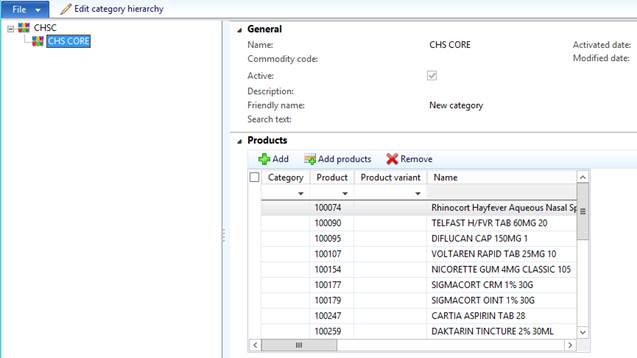
- Assign the relevant Retail channels.
- In the Products section, click Add lines to add products to the L1 node of the CHS hierarchy.
 Fred Learning Pathways