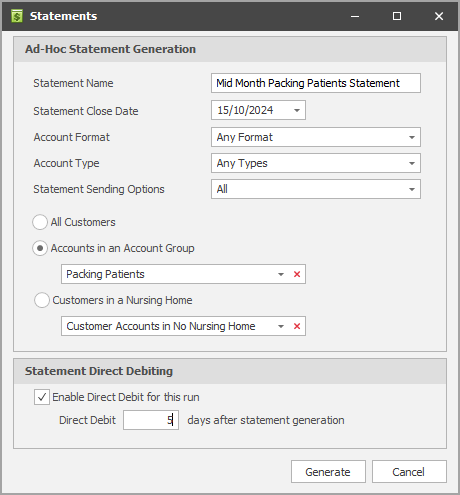
From Statements, you can adjust scheduled statement runs or perform an ad-hoc statement run when required.
- From Contacts, select Statements.
- Click Ad Hoc Generation in the toolbar, insert a Statement name, and set the Closed date.
- (If required) select the Account Format and/or Account Type.
- (If required) set the filters to limit the ad hoc run to Account Groups and/or Nursing Homes.
-
(If required) enable Direct Debit for the statement run.

- Click Generate.
Before you Print ad-hoc statements, you must Resolve any issue.
- From Contacts, select Statements.
In the Statement History section, ensure the Accounts column is the same as the Generated column.
- To resolve any issues, select the last Statement batch, and then click Resolve.
This option is only active for the last scheduled statement run (if statement generation issues are found).
- Select the account and do one of the following:
- To view the account card, select Open ...
To remove and regenerate the statement for this account based on the current statement schedule, select Regenerate.
Issue Description Resolution Forward An existing statement exists with an end date greater than that of the statement schedule. Select Open….
View Statements and/ or Activity tabs.
Close the account card.
Closed Accounts closed during this statement period. Select Open….
View Statements and/ or Activity tabs.
Close the account card.
Short Accounts with a short period (usually due to a mid period statement generation). Select Open….
View Statements and/ or Activity tabs.
Close the account card.
(Optional) Select Regenerate.
- Repeat the above steps for all accounts (as required).
- Once complete click Close.
- In the Statement History section, select the latest statement batch, and Click Print.
- In the Print Statement screen, set the print options, and then click OK.
Item Description Statement Restriction Restrict which accounts should be included for printing.
Focus on a specific account group such as accounts in a Nursing Home or a user-defined account group.
Print settings Set you Group By and Order by preferences. -
Fred Office Plus generates the report as PDF.
-
Select File, then Print.
Remember to check and set the Page Scaling or Page Arrange options to None or Actual Size to prevent page misalignment. Make sure your statement (or A4) paper is loaded in the printer.
- Click OK.
- From Contacts, select Statements.
-
In the Statement History section, ensure the number in the Accounts column is the same as that in the Generated column.
- Click Email.
-
Set the Statement Options as required:
Item Description Statement Restrictions Restrict which accounts should be included for emailing.
Focus on a specific account group such as accounts in a Nursing Home or a user-defined account group.
Email Settings Choose a predefined email template.
Schedule when to send the email.
- When finished, click Send.
-
Fred Office Plus sends email statements to the selected accounts.