Reports
The ScanCheck report provides statistics on the ScanCheck process. It can show the number or percentage of scans done for a time period, and for selected users. The results display either successful scans, or unsuccessful scans (either not scanned, scanned incorrectly or scanned incompletely). The results are based on dispense date and time, not the scan date and time.
Generate the Scan Check Statistics report
- Tap
 (bottom of the screen) to access all reports.
 - Select Scan Check Statistics (or press K), then tap OK to open it.
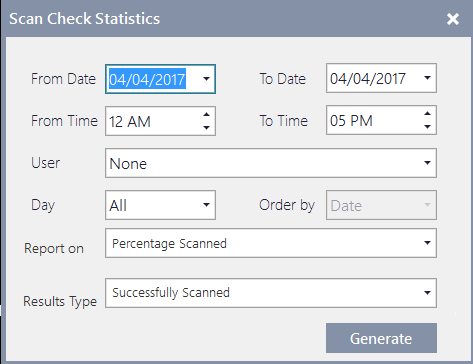
- Select the relevant criteria:

Field Description From Date and To Date Set to Today by default.
Use the usual keyboard shortcuts to increase or decrease the Date selection.
See Date Function keys.
From Time and To Time Set to 9 to 5 by default.
Time settings are retained for all subsequent sessions.
User - None: All scanchecks (all users combined) sorted by date.
- All: All scanchecks selected, sub-sorted by users.
- Select a specific user from the list.
Day Set to All by default. Report on Select Percentage Scanned (default option) or Number of Scripts Scanned. Results Type Select Successfully Scanned (default option) or Unsuccessfully Scanned.
- Yes: Print the report, then close the preview to return to the report screen.
- No: Close the preview without printing to return to the report screen.
When previewing any generated report, press [ESC] to close the report.
A dialog prompt is displayed with an option to print the report before closing it.

By default, the focus is set on No.
After generating any report in Fred Dispense Plus, you can now use the standard <CTRL + P> shortcut to invoke the print dialog.
The report can be printed immediately or saved locally as .pdf
The layout of the report varies depending on the filters applied.


 Fred Learning Pathways