Create discounts manually
Products
Discounts are used to set a new price for a product. A Discount can be applied to an individual products or to an entire hierarchy. When a discount is applied to a hierarchy, any product added to the hierarchy attracts the same discount.
| Discount Type | Description |
|---|---|
| Threshold discount |
The Discount is applied to each transaction, based on the amount spent. For example, spend $100.00 and receive 10% off. |
| Deal price |
Buy 2 for $4.00, buy 3 for 5.50 Only applies to quantities of the same product. |
| Least expensive | Least expensive: Buy two and receive the discount on the least expensive product. |
| Mix and Match - Line specific | Buy products in this line and receive the discount. In Lines, configure the product combination and number of product needed to trigger the Discount. For example, buy <Number of products needed> criteria products receive <Number of products needed> target product. |
| Mix and Match - Least expensive | Buy two and receive the discount on the least expensive product. |
- From the Merchandising section of the Dashboard, go to the Pricing and discounts section and click Discounts.

- In the Discounts screen, click New to create a new discount and enter a Name.
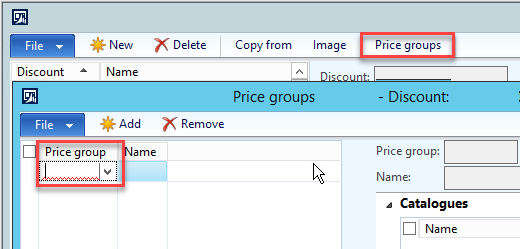
- In the tool bar, click Price group and associate this discount with the relevant Price group.

This ensures the Discounts are "pushed" to the stores in the Price group.
- In the Discounts screen, configure the following fields:

Field Description Status Leave the Status as Disabled until you ready to apply the promotion.
Discount Code (Optional) Used to set up a code for the promotion that needs to be entered for the discount to be claimed.
Use to track Discounts against other criteria (for example, stores or accounts).
This is the code the customer can give to activate the promotion.
Concurrency - Exclusive: Only one eligible discounts applies.
- Best Price: If eligible for multiple discounts, apply the discount that returns the best price to the customer.
- Compounded: Allow daisy-chain (cumulative) discounts.
For the Compounded discount to apply, the product needs to be in two discounts that are both set to compound and be eligible for both discount then it will receive both discounts added together
Price/Discount - Discount%
- Discount Amount
Validation Period - Effective Date: The Date the discount starts.
- Expiration Date: The Date the discount ends. This can be edited to extend the Discount period beyond the original date.
- Advanced: This can be used to set Discounts by Time Period.
- In the Lines group, click
 to add more products to add more products (or an entire Category) from the Retail Hierarchy.
When a Category is added to a Discount group, any product added to this Category (in the Retail Hierarchy) attracts this discount.
- Click
 to remove individual products from the hierarchy that will be discounted.
 - For each Line, set the Discount method to Discount Percentage or Discount Price.
Both discount methods can be applied to different products in the same Discount group.
- Once the Discount configuration is complete, set the Status to Enabled.
The fields on the Discounts screen can no longer be edited.
To make further changes, change the Status to Disable.
- Close the screen.
Once enabled, Discounts take effect immediately. We recommended to set the discount's Effective Date for the next day. All Discounts values are stored locally and continue to apply when the store is trading offline.
A threshold discount uses tiers to offer specific discount rates. For example, spend $40.00, you can get 10% or $1.00 off.
It can be broken down into retail categories, as well as individual items. You can choose items that are non-discountable to be included in the threshold discount, but discount tiers are applied only to these items associated with the discount.
- From the Merchandising section of the Dashboard, go to Pricing and discounts section and click Threshold Discount.
- In the Threshold Discounts screen, click New to create a new discount and enter a Name.
- In the Threshold screen, configure the following fields:
Field Description Discount Code (Optional) Used to set up a code for the promotion that needs to be entered for the discount to be claimed.
Use to track Discounts against other criteria (for example, stores or accounts).
This is the code the customer can give to activate the promotion.
Concurrency - Exclusive: Only one eligible discounts applies.
- Best Price
Exclusive is the most likely setting for a Threshold Discount. Best Price and Compounded can be set instead.
Price/Discount - Expand and set the required details.
Validation Period - Effective Date: The Date the discount starts.
- Expiration Date: The Date the discount ends. This can be edited to extend the Discount period beyond the original date.
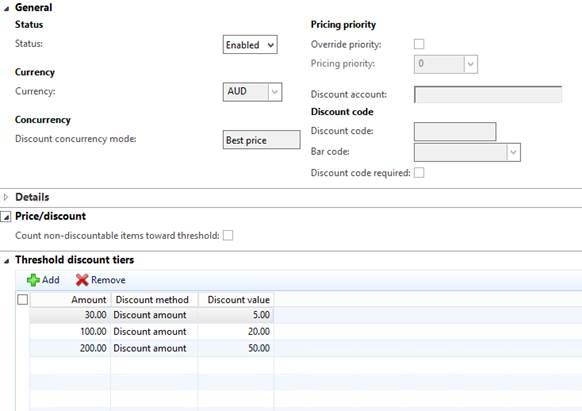
Threshold Discount Tiers - Add in the Tiers to obtain your discounts.
- The amount will be the total to reach.
- Discount Method will be the application of an amount or a percentage.
- Discount value will be a dollar amount or a percentage.

- In the Threshold Discount screen, expand Lines and add products to the discounts:
- To add an entire category: under Lines, click Add and select the Category.
- To add an individual product: Under Lines, click Add products.
- Set all other options as required.
- In the tool bar, click Price group and associate this discount with the relevant Price group.
Once the Threshold configuration is complete, set the Status to Enabled.
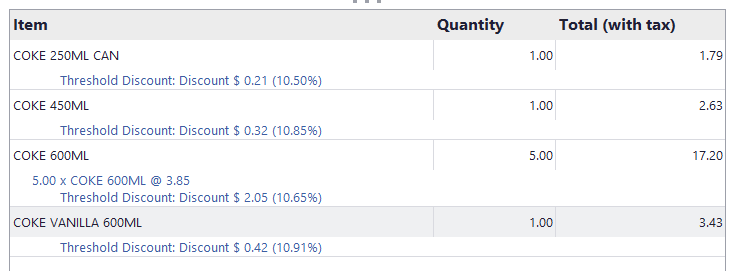
In Fred NXT POS, the Threshold discount displays as follows:

A deal price discount will allow you to configure buy x for y scenarios.
It only applies to quantities of the same item.
In the below example, we want to get three products for $5.00.
- From the Merchandising section of the Dashboard, go to the Pricing and discounts section and click discounts.
- In the Mix and Match screen, click New to create a new discount and enter a Name.
- In the Mix and Match screen, configure the following fields:
Field Description Discount Code (Optional) Used to set up a code for the promotion that needs to be entered for the discount to be claimed.
Use to track Discounts against other criteria (for example, stores or accounts).
This is the code the customer can give to activate the promotion.
Concurrency - Exclusive: Only one eligible discounts applies.
- Best Price
Exclusive is the most likely setting for a mix and match discount. Best Price and Compounded can be set instead
Price/Discount - Deal Price
- Enter the Deal Price Value
- In Multiple Occurrences Mode, it should always favour the customer.
Validation Period - Effective Date: The Date the discount starts.
- Expiration Date: The Date the discount ends. This can be edited to extend the Discount period beyond the original date.

- In the mix and match discount screen, expand Lines and add products to the discounts:
- To add an entire category: under Lines, click Add and select the Category.
- To add an individual product: Under Lines, click Add products.
- Set all other options as required.
- In the tool bar, click Price group and associate this discount with the relevant Price group.
- To set the mix and match options for your products, click Mix and match line groups (in the menu bar).
- In the Mix and match line groups window, select the Line group(s).

This example, shows the settings for a Buy 3 for $5.00.
- Click Close when done.
- Apply the Line group to each of the products back in the mix and match discounts window. The Target, or number of products needed to execute the deal will prepopulate for you.

- Once the Deal Price configuration is complete, set the Status to Enabled.
In Fred NXT POS, the Deal discount displays as follows:

Buy products in this line and receive the discount.
- From the Merchandising section of the Dashboard, go to the Pricing and discounts section and click Mix and Match discounts.
- In the Mix and Match discounts screen, click New to create a new discount and enter a Name.
- In the Mix and Match discounts screen, configure the following fields:
Field Description Discount Code (Optional) Used to set up a code for the promotion that needs to be entered for the discount to be claimed.
Use to track Discounts against other criteria (for example, stores or accounts).
This is the code the customer can give to activate the promotion.
Concurrency - Exclusive: Only one eligible discounts applies.
Exclusive is the most likely setting for a mix and match discount. Best Price and Compounded can be set instead - see table above for details.
Price/Discount - Expand and set the required details.
Validation Period - Effective Date: The Date the discount starts.
- Expiration Date: The Date the discount ends. This can be edited to extend the Discount period beyond the original date.
Leave the Status as Disabled until you ready to apply the promotion.
- In the tool bar, click Price group and associate this discount with the relevant Price group.
- To set the mix and match options for your products, click Mix and match line groups (in the menu bar).
- In the Mix and match line groups window, select the Line group(s).

- Click Close when done.
- In the Mix and Match discounts screen, expand Lines and add products to the discounts:
- To add an entire category: under Lines, click Add and select the Category.
- To add an individual product: Under Lines, click Add products.
- Set all other options as required.

- Once the mix and match discount configuration is complete, set the Status to Enabled.
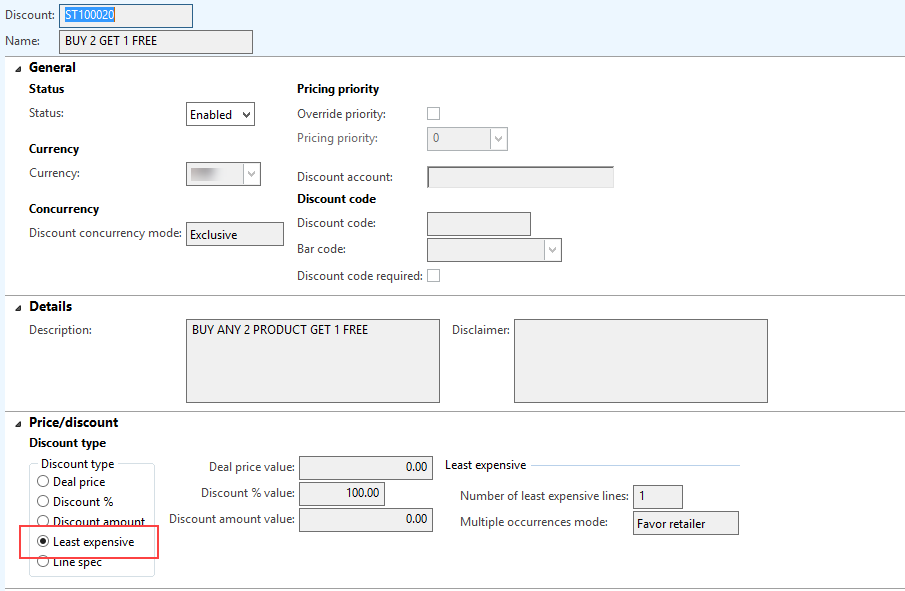
Buy two and receive the discount on the least expensive product.
- Go to Merchandising > Pricing and discounts > Discounts.
- In the Mix and Match screen, click New to create a new discount and enter a Name.
- In the Mix and Match screen, configure the following fields:
Field Description Discount Code (Optional) Used to set up a code for the promotion that needs to be entered for the discount to be claimed.
Use to track Discounts against other criteria (for example, stores or accounts).
This is the code the customer can give to activate the promotion.
Concurrency - Exclusive: Only one eligible discounts applies.
Price/Discount - Least expensive
- Number of least expensive
- Favour the retailer or Favour the customer
Validation Period - Effective Date: The Date the discount starts.
- Expiration Date: The Date the discount ends. This can be edited to extend the Discount period beyond the original date.
- In the tool bar, click Price group and associate this discount with the relevant Price group.
- To set the mix and match options for your products, click Mix and match line groups (in the menu bar).
- In the Mix and match line groups window, select the Line group(s).
In this example (Buy 2 and receive a discount on the least expensive product), select the Line group with Number of products needed is 2.
- At the bottom of the screen, expand Lines and add products to the discount.

- Once the mix and match discount configuration is complete, set the Status to Enabled.
 Fred Learning Pathways