General option with Fred Mobility
Motorola
Due to increasing security risks, we have ended remote access support for the legacy Motorola and Datalogic Windows-based mobility guns. The old mobility devices can no longer be guaranteed to function reliably or securely in today’s environment.
We can provide self-help documentation and phone support only. While we’ll continue to assist where possible, we strongly recommend upgrading to a newer mobility device. Contact your local Fred representative or sales@fred.com.au if you’d like to discuss upgrading to a new device.
The General options from the Fred Mobility main screen allows you to configure various item stockcard options to update when using Fred Mobility.
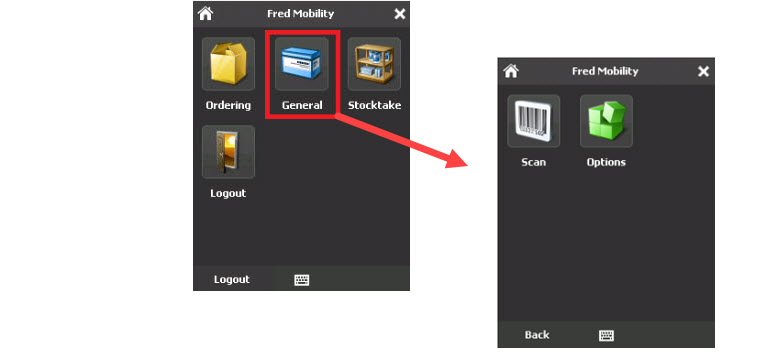
- Use Options to configure the options you will be prompted for when you choose Scan.
- Select the options you wish to be prompted for or deselect the options not to be prompted.
You must tap Save for changes to take effect.
- Item Cost
- Item Price
- GST Status
- Alias
- Quantity on Hand
- Quantity Committed
- Quantity Available
- Restock Level
- Reorder Point
- Print Labels
- Queue Labels
- Login to Fred Mobility using the default login or your Fred Office Plus username and password.
- In the main screen , tap General.
- In the next screen, tap Options.
-
Deselect all options and select only the Item Price and Queue Labels options.
You may need to scroll up and down to check that you have the correct options selected. For example, you would need to scroll up in the image below to see the Item price option.
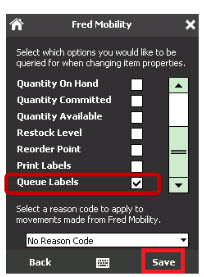
- Tap Save, then tap Scan.
- Scan the item or enter a code for an item you wish to scan.
- Enter the New Item Price and press Enter on your Fred Mobility device.
If no figure is entered, the Current Item Price is retained.
Fred Mobility displays a confirmation message.
- To send the item to the Label Queue, tap Yes.
- Repeat the process for all items to be updated.
- Once complete, logout of Fred Mobility and return your device to the charger.
This option prints labels directly from the Fred Mobility device, rather than queue them for printing later.
- Login to Fred Mobility using the default login or your Fred Office Plus username and password.
- In the main screen, tap General, then tap Options.
-
Select the Print Labels checkbox and deselect all other options.
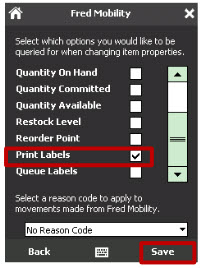
- Tap Save.
- In the next screen, tap Scan.
- Scan the item or enter a code for an item you wish to scan.
- In the Choose Label Format field, use the drop-down menu to select the label format.
- In the Number of Labels field, enter the label count and then press Enter on your Fred Mobility device.
- Repeat the process for all items you wish to print labels for.
- Once complete, logout of Fred Mobility and return your device to the charger.
- Login to Fred Mobility using the default login or your Fred Office Plus username and password.
- In the main screen, tap General.
-
In the next screen, select Queue Labels and deselect all other options.

- To finish, tap Save.
- In the next screen, tap Scan.
- Scan the item or enter a code for an item you wish to scan.
Fred Mobility displays a confirmation message.
- To send the item to the Label Queue, tap Yes.
- Repeat the process for all items to be queued.
- Once complete logout of Fred Mobility and return your device to the charger.
- Login to Fred Mobility using the default login or your Fred Office Plus username and password.
- In the main screen, tap General.
-
Select Quantity Committed and deselect all other options.
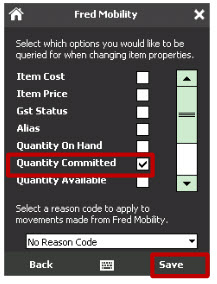
- To finish, tap Save.
- In the next screen, tap Scan.
- Scan the item or enter a code for an item you wish to scan.
- Enter the committed quantity and then press Enter on your Fred Mobility device.
The quantity entered will overwrite the Current Quantity Committed. If no figure is entered, the Current Quantity Committed will be maintained.
- Repeat the process for all items to be updated.
- Once complete, logout of Fred Mobility and return your device to the charger.
- Login to Fred Mobility using the default login or your Fred Office Plus username and password.
- In the main screen, tap General.
- In the next screen, tap Options.
-
Select Restock Level and Reorder Point.
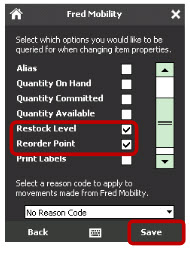
- To finish, tap Save.
- In the next screen, tap Scan.
- Scan the item or enter a code for an item you wish to scan.
- Enter the New Restock Level and then press Enter on your Fred Mobility device.
The figure entered will overwrite the Current Stock Level. If no figure is entered, the Current Stock Level is retained.
- Enter the New Reorder Point and then press Enter on your Fred Mobility device.
The figure entered will overwrite the Current Reorder Point. If no figure is entered, the Current Reorder Point is retained.
- Repeat the process for all items to be updated.
- Once complete, logout of Fred Mobility and return your device to the charger.
- Login to Fred Mobility using the default login or your Fred Office Plus username and password.
- In the main screen, tap General, then tap Options.
- Select Quantity On Hand and deselect all other options.
Tap the drop-down arrow and select a Reason Code.
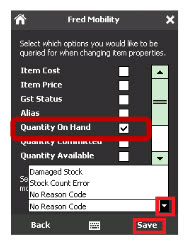
- To finish, tap Save.
To select a reason code, you must have a reason code set up in Fred Office Plus > Tools menu > Reason Codes.
- Tap Scan, then scan the item or enter a code for an item you wish to scan.
- Enter the New Quantity On Hand and then press Enter on your Fred Mobility device.
The figure entered will overwrite the Current Quantity On Hand. If no figure is entered, the Current Quantity On Hand will be maintained.
- Repeat the process for all items to be updated.
- Once complete, logout of Fred Mobility and return your device to the charger.