General accounts and statements activities
- From Contacts, select Accounts.
- Search for and open the account.
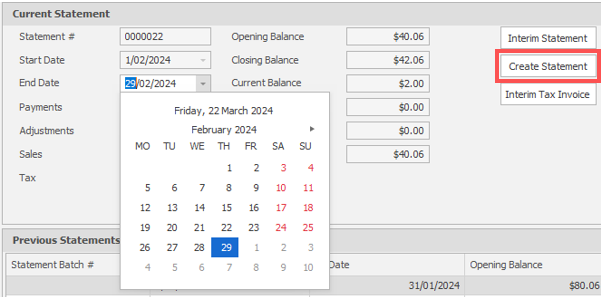
- In the Statements tab, select the End Date.
- Click Interim Statement.
-
The Interim Statement automatically opens as a PDF , ready for printing.
This is the recommended option. No record of the Interim Statement is maintained on the account. It is not displayed in Previous Statement or Statement History.
For a permanent statement record, click Create Statement.
- From Contacts, select Statements.
- Highlight the current schedule (bottom of page) and click Summary.
- Open the Account Balance Preview report.
- Leave the Account Format filter set to Credit.
- Click Run Report.
- From Contacts, select Statements.
- Highlight the current schedule (bottom of page) and click Print.
- Select Print Statement options and OK.
-
The settings selected in Print Statements are retained until the next time you print statements.
- Click the printer icon and OK.
Once a cause is found and rectified (as below), the statement must be deleted and regenerated, so that changes take effect.
Find the cause of a missing address and fix it
- From Contacts, select Accounts.
- Search for and open the account.
- Go to the Address tab and do one of the following:
-
If this option is selected ... Action Let me specify a specific address to use Ensure details are entered in the fields below, and then click Save. Use the customer address that this account belongs - Go to the General tab.
- Click the ellipsis ... next to Customer.
- In the General tab enter the details, and then click Save and Close.
The Customer card closes and Fred Office Plus takes you back to the Account card.
Let me choose a Nursing Home and use that as the Billing Address - Ensure a nursing home is selected
- If there is no nursing home selected, click Find and select the relevant entry in the search results.
- If the nursing home does not exist or its existing details need to be modified, this must be done in Fred Dispense.
Once saved, the newly created or updated nursing home is available immediately for selection.
See also Add Entry
Let me choose another customer and use that as the Billing Address - Ensure a customer is selected.
- Go to the General tab.
- Click the ellipsis ... next to Customer.
- Enter details in the General tab.
- Click Save and Close.
Delete previous statement and regenerate
- In the open account window, click on the Statements tab.
- Select Delete, then Save. This will delete the most recent statement batch.
-
Use the drop-down and select the End Date.

- Select Create Statement, then select Save and Close.
- Click
 Print.
 - In the Print window, set Page Scaling to None.
- Ensure Auto-Rotate and Centre is selected.
- Tap OK to save your changes.
The Page Scaling options have been changed and will be retained on this computer.
-
Repeat this process on all the computers used to print statements.