ePrescribing in Fred Dispense
ePrescribing is embedded in Fred Dispense, and displays queued scripts sorted by collection time. All the options selected at the Scripts In counter, such as Brand and Delivery, also display in the embedded ePrescribing Queue. Scripts in the Queue are visible to all users on all Dispense terminals. When a script is selected for dispensing, it is visible on the terminal where it is active for dispensing. Users retain the ability to scan barcodes directly into Fred Dispense and by-pass the Queue process.
View the ePrescription Queue in Fred Dispense
Refer to Queue ePrescriptions for details about queuing ePrescriptions in MedView Flow.
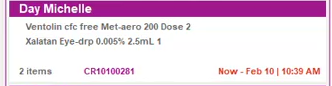
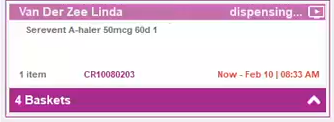
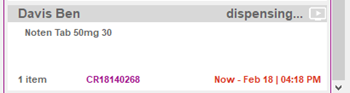
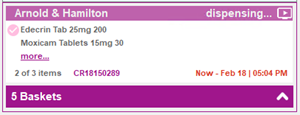
By default, the highest priority scripts (due now) display in the Queue. The total number of baskets is displayed at the bottom of the Queue.
-
To view additional scripts in the Queue, press <CTRL + Up Arrow> or in the Queue.
-
Press <CTRL + Down Arrow> or to collapse the display to a single basket.
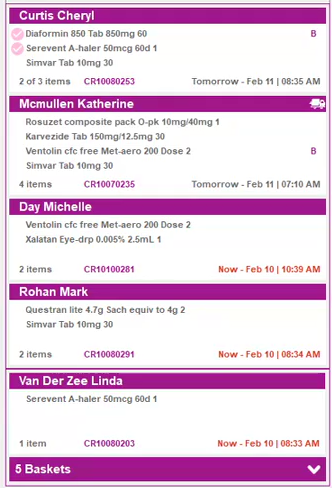
Queue flags
The flags displayed on the baskets reflect the options selected at the Scripts In counter:
-
- Items have been dispensed.
-
B - The patient has requested a specific brand for this item.
Brand Requested displays as a tooltip.

-
D - The patient does not want these items today. The pharmacist will to defer these items instead of dispensing them.
-
- The patient wants this item delivered.

-
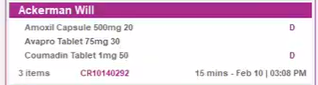
Red time stamp - The script is due for collection now (high priority basket).
-
Black time stamp- The script is due for collection later (low priority basket).
-
Hover over item to display the patient name as tooltip and select item for a specific patient from a multi-patients basket.

-
Drugs with long names wrap to a second line, with an ellipsis if going over three lines.
Hover over the ellipsis to display the full drug name.
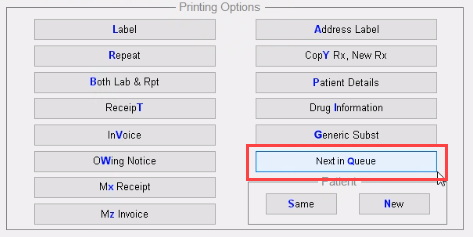
Queue next script (from the Main screen)
On the Main screen, type <Q>, then [ENTER] in Patient Name or Repeat No. to select the next basket and initiate dispensing.

Queue next script (from the Wait screen)
On the Waitscreen, press Next in Queue or <Q> to dispense the contents of the basket as displayed in the Queue.
Select a basket to dispense
By default, baskets display in priority order, but can be selected as needed.
-
Select a basket - Double-click the patient name in the purple header.
Once the basket is selected, the details of the first item are loaded in the Main Dispense screen.
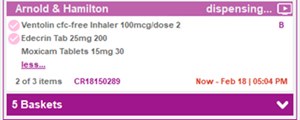
The basket banner changes to a pale colour and the flag dispensing ... is added to indicate it is actively being dispensed on this terminal.
When a basket is selected, it is no longer visible to other users in the general Queue. It is only visible on the terminal where it is dispensed.
The basket count in the Queue is automatically decremented.
The next priority basket becomes visible on all terminals, until selected for dispensing.
-
Clear the basket selection (without dispensing) - If you do not want to dispense the selected script, double-click the patient name (purple header) again to return it to the Queue.
The flag dispensing ... is removed and the header is returned to its original purple colour. The script is now visible to all users on other dispense terminals. The basket count in the Queue is automatically incremented.
Select an individual item from a basket
Items in baskets can be selected individually for immediate dispensing.
-
Display the content of a basket, then double-click a single item to select it for dispensing.
Other items stay in the basket.
The basket selected for dispensing displays two items by default.
If there are more than two items, click more ... to display all the items in the basket (then less ... to collapse it again).
When one or more items have already been dispensed, the item just dispensed and the next item to be dispensed are displayed
The Queue display is automatically adjusted and the lower priority baskets are temporarily hidden, so that the History panel and the Script image section remain visible at all times.
-
Dispense this item, then select the next item in the same basket to dispense it.
- or -
Double-click the patient header to release this basket back to the general Queue.
Once dispensing is completed, the Queue displays the baskets in their default priority order.
Scan a barcode into Fred Dispense
When you scan a barcode directly into Fred Dispense instead of queuing it from MedView Flow, the script details are loaded in to the Main Dispense screen.
A single active basket is displayed in the Queue, together with a script image and new entries in the History panel.
Once this script is dispensed, the Queue is returned to its original priority order.
Edit an ePrescription
When an ePrescription is selected for editing, the Queue only displays one (active) basket and the associated script image.
Script images
When dispensing or editing an electronic prescription, an image of the ePrescription is displayed on the Main Dispense screen. The script image tile is located in the bottom right corner of the Main Dispense screen, below the History pane.
The script image displays the original prescription along with the repeat, if applicable.
-
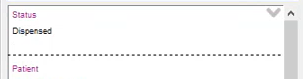
Press <CTRL + > to toggle between the Original and Repeat (blue and yellow) view and the Script Details (white) view.
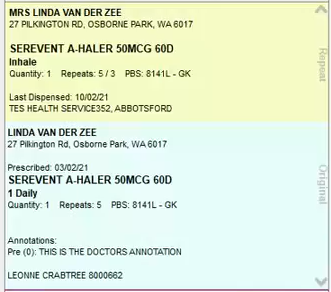
The Status of each script is displayed at the top of the Script Details view.
For example, Active, Dispensed, or Deferred
Finalise the dispense
To complete an ePrescription, enter your password at the prompt.
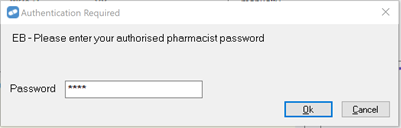
Only Pharmacists or Supervising Pharmacists are allowed to finalise a script. If the Current User is not approved for ePrescribing—for example, a dispense technician—the following message is displayed:
Once the script is dispensed, the Queue is updated and displays the next basket in priority order.
Repeats
Upon completing dispensing of an ePrescription, Fred Dispense does not print a Repeat form. Instead, the patient receives a notification (SMS or Email) or a token is printed to the Report Printer according to the preference as stored in Patient Details. The new token is to be presented when the next supply is due.
Repeats are received and queued in MedView Flow (just like the original script).
When the repeat is loaded into the Main Dispense screen, it displays the following indicator.

Exclude a script from MySL
The following information is applicable once MySL is available at your pharmacy.
By default, if a patient is registered for MySL, all prescriptions are included in their MySL. The patient can request either the prescriber or the pharmacist to exclude a particular medication from their MySL record.
If the prescription is excluded from MySL, then you will need to change the delivery preference via the Patient Update screen (F8), so that the patient can receive the token for the repeat.
Scenario 1 - Patient requests prescriber to exclude prescription from MySL
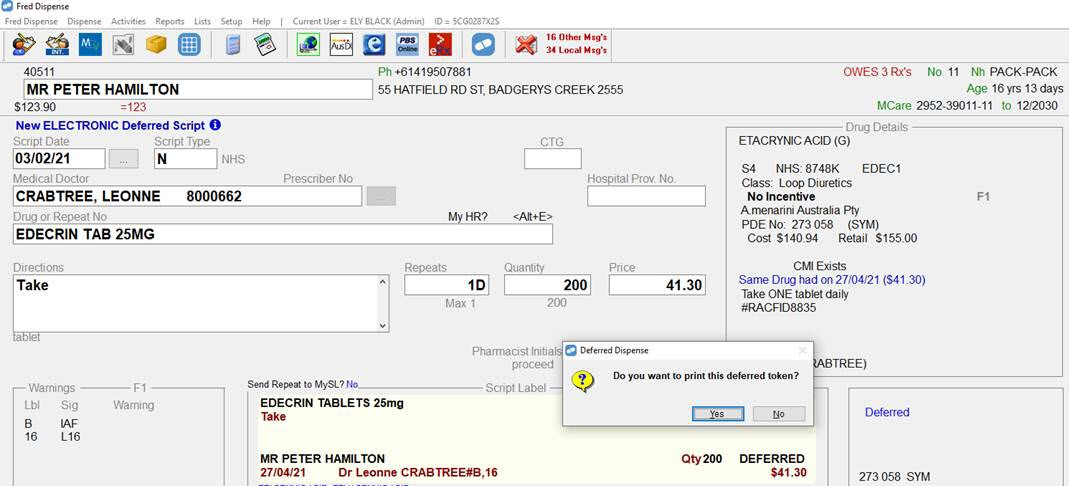
In the example below, the patient has asked the prescriber to exclude the medication from their MySL record. When you scan the prescription, then you will see a Send Repeat to MySL? No indicator above the Label Preview.

If the patient wants the medication to be included in their MySL record, you can add it back in by pressing CTRL+Shift+X. The Send Repeat to MySL? No indicator is removed.
Scenario 2 - Patient asks pharmacist to exclude prescription from MySL
If the patient asks you to exclude the prescription from MySL, then once you scan the prescription, you can press CTRL+Shift+X. The Send Repeat to MySL? No indicator will display.
Once the prescription is dispensed, the status of include/exclude persists for the remaining repeats.
Scenario 3 - Patient asks pharmacist to exclude an original prescription from their MySL and defer it for later
If a customer asks you to exclude an original prescription from their MySL but does not want the prescription dispensed that day, then once you scan the prescription:
- Press CTRL+Shift+X. The Send Repeat to MySL? No indicator will display.
- In the Repeats field, enter D after the number of repeats—for example, 1D.
-
Finalise the prescription as per usual procedure.
If the settings in Patient Details for Send Electronic Prescription to is other than Printer, the following prompt will display, enabling you to print a copy of the deferred prescription.