Print Patient Dockets for Script Collection
Fred Dispense can print dockets for patients who leave their scripts to be dispensed and collected later. This function is controlled by the presence of a file named docket.dat, which contains the information you want to print on the dockets. If the file is not present, you are not prompted to print dockets.
Docket printing is supported with a thermal Epson TM88 printer. Other printers may also work, but are not officially supported. For details on configuring your printer for docket printing, see Step 2: Set up your printer for patient docket printing.
Docket printing during dispensing
If you have a docket.dat file in your C:\FredHealth\Fred\Data folder, each time you select a patient, Fred Dispense displays the Docket Print prompt.
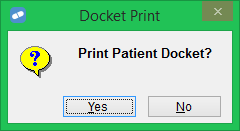
You have the following options:
- [Y]es: Print the docket, and return to the Patient field to select the next patient.
- [N]o: Don't print the docket; continue dispensing for this patient.
- [Esc]: Don't print the docket, nd return to the Patient field to select the next patient.
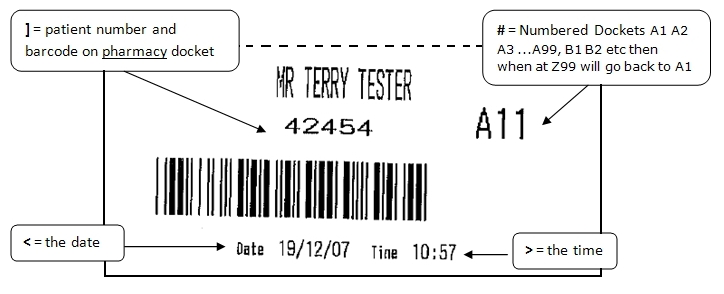
The docket prints in two parts: the patient copy and the pharmacy copy.
Enable patient docket printing
Step 1: Set up the docket.dat file
This procedure must be performed on each dispense terminal you want to enable.
To disable patient docket printing, simply remove the docket.dat file from your C:\FredHealth\Fred\Data folder.
- On the dispensing terminal, navigate to
C:\FredHealth\Fred\Data - Right-click and select New > Text Document.
-
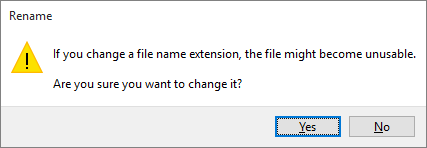
Name the new file
docket.dat- If the Rename prompt is displayed, click Yes).
-
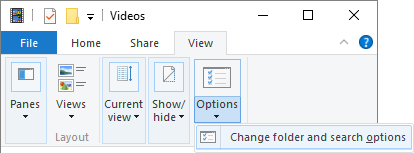
If the Rename prompt is not displayed, check that file extensions are being displayed properly:
- From the View menu, select Options > Change folder and search options.
- On the Folder Options window, select the View tab.
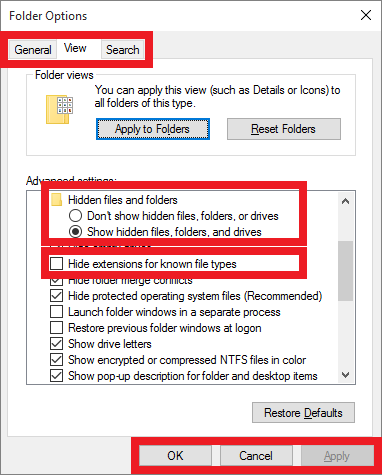
- Ensure Show hidden files and folders is selected.
- Ensure Hide extensions for known file types is not selected.
- If you made any changes, click Apply, then click OK.
- Make sure that your new file is named
docket.dat, notdocket.dat.txt.
- From the View menu, select Options > Change folder and search options.
- If the Rename prompt is displayed, click Yes).
- Right-click the
docket.datfile, then select Open With > Notepad. -
In Notepad, enter the docket details as described in the table below.
Everything in the
docket.datfile must be entered in a single line. Additional lines cannot be read.Option Description Rules #Prints the docket number. The numbering goes from A1 to Z99, then returns to A1. <Prints the current date. >Prints the current time. [Prints a barcode at the the top of the docket. Must be placed before the date and time <>]Prints a barcode at the bottom of the docket. Must be placed before the date and time <>Free textA custom message for your pharmacy Must be placed at the end of the other options. You can enter up to 270 characters including spaces. On the docket, this will print as up to 9 lines of 30 characters each. Example
If your
docket.datfile contains the following text:#[]<>SPECIFIC PHARMACY MESSAGE GOES HEREThe patient docket will look like this:

And the pharmacy docket will look like this:
-
To save your docket settings, click File > Save, then close Notepad.
Step 2: Set up your printer for patient docket printing
Docket printing is supported with a thermal Epson TM88 printer. Other printers may also work, but are not officially supported.
Your printer must use the Generic / Text Only driver. If you need help with configuring your printer driver, contact the Access helpdesk support via your Fred Help Portal.
-
From the Setup menu, select System Configuration.
The System Configuration window is displayed.
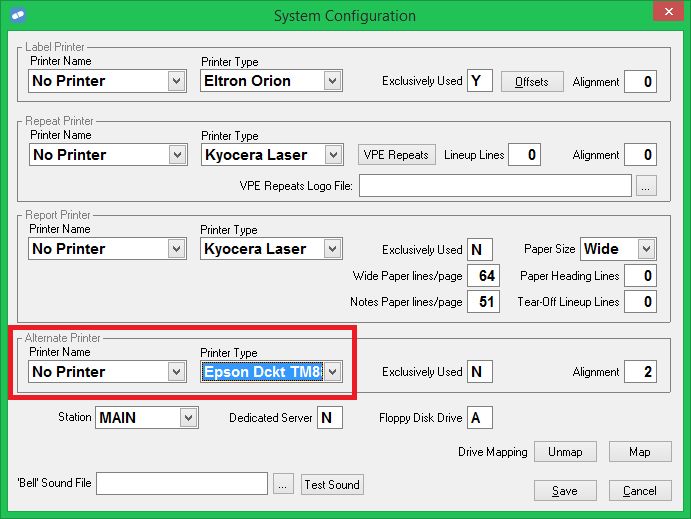
- In the Alternate Printer section, ensure that:
- The correct Printer Name is selected.
- The Printer Type is set to Epson Dckt TM88.
- If you changed any settings, click Save.