Receive ePrescriptions
MedView Flow enables pharmacy staff at the front of shop counter to receive scripts from customers. These scripts are then placed in an electronic basket and moved to the queue to be dispensed. Each electronic basket is assigned a unique identifying number that can be given to the customer to assist with collection.
In order to facilitate this process, you should think carefully about your hardware requirements. This will allow you to set up the combination of static PC, scanner and tablet that best suits your pharmacy.

Prerequisites
Site-level account for MedView Flow
Individual users cannot log into the MedView Dashboard. You need to use a site-level account that is shared by everyone at your site. Once your site is logged in, your staff can automatically access any MedView apps that also use a site-level account. For example, MedView Paperless.
Pharmacy Group Stores
If your user accounts are managed by your pharmacy group, rather than by MedView, you need to perform a few extra steps the first time you log your 'site user' into the MedView Dashboard.
Refer to MedView Flow webhelp > Set up your Site User Account
Enable Cookies
Third-Party Cookies need to be enabled in your browser in order to access MedView Flow.
For information about the most commonly used browsers, refer to MedView Flow webhelp > Enable Cookies
Access MedView Flow
- Navigate to the MedView Dashboard https://portal.mymedview.com.au
- Enter your store username and password, then click Log In.
- On the MedView Dashboard, select the Flow app tile.
Recommended:
- Right-click anywhere on the dashboard to create a shortcut on your desktop.
- Alternatively, make sure you bookmark this site in your preferred browser: https://portal.mymedview.com.au
Enter an ePrescription in MedView Flow (front of shop)
- In MedView Flow, navigate to IN (top right).

-
Use your scanner or tablet camera to scan the script or token presented by the customer.
You can scan:
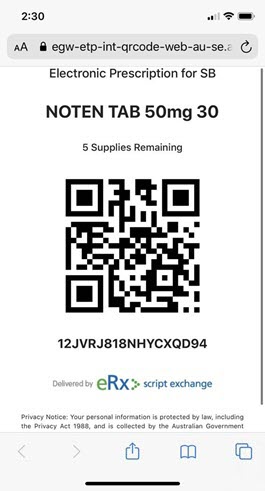
- An electronic script token—from a mobile device or a printed email.
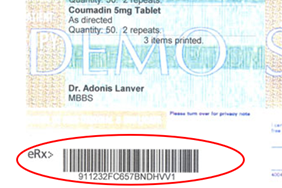
- The barcode printed under the QR Code (in cases where your older model scanner does not read QR Codes).

- A paper script that has a barcode.
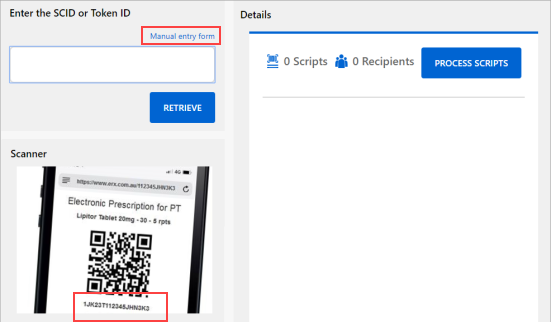
Alternatively, enter the number displayed below the barcode (SCID) or QR Code (Token ID) manually, then select Retrieve.
- An electronic script token—from a mobile device or a printed email.
- If the customer has more than one script, scan any additional scripts.
The Details panel displays the number of scripts and the number of recipients. Each recipient is listed in a separate tab.
Click each tab to view the details for this recipient.

- Once the Details Panel displays the recipient's information and their medication(s), select Process Scripts.
The contents of the electronic basket are displayed.
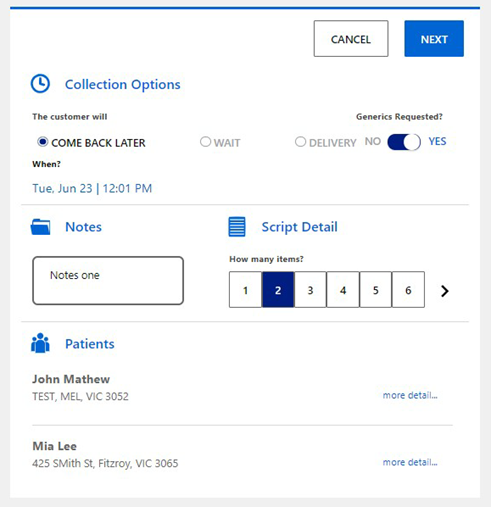
- Review and update the information in each section as needed.
Section Description Script recipients Displays the patient name and address for each of the scripts in the electronic script basket.
- Click the patient name to display more information, such as Medicare number or Concession card/type.
Script details How many scripts?
Automatically displays the number of items (medications) in the electronic basket. You can change this number—for example, if the customer also has a handwritten script.
Generics Requested?
By default, Yes is selected.
If the customer does not want generics for one or more medications, then select No. The Generics or substitute product popup displays.
- If the customer doesn't want generic substitution for any of the medications, select Confirm.
- Otherwise, select Yes for any medication the customer is willing to accept generic substitutions for, add a comment (optional) and then select Confirm.
Collection Options Record the customer's preferences for collection. The answers here will prioritise the baskets in the queue.
By default, COME BACK LATER in 15 mins is selected.
You can select a different collection time:
- 30 mins
- 1 hour
- Tomorrow—automatically sets the collection time to 24 hours from now.
- Later—choose the date and time from the popup and then select Set Date & Time.
Alternatively, select WAIT if the customer wants to wait or DELIVERY if the customer wants the order delivered.
If you select DELIVERY, then also provide details under When? and Where? for the delivery time and location.
Notes Provides a place for you to record any additional information for the pharmacist. - Select Next to display the Basket Number dialog.
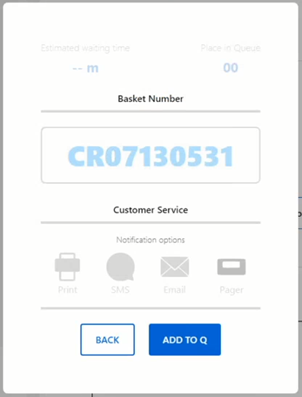
You can change the Basket Number—for example, if your pharmacy's workflow includes physical baskets that are already numbered.
- Select Add to Q to move he electronic basket the dispense queue.
The input screen displays so you can accept scripts from the next customer.
For further details, refer to MedView Flow webhelp > Receive Incoming Scripts